Friday, 17 June 2022

Pretty Pink Posh June 2022 Release - Adorable Dino's!

 Hey friends!  Today I'm delighted to be joining Pretty Pink Posh on the June 2022 blog hop!  There are so many cute new sets and I just couldn't wait to use those cute Dino sets!!


Be sure to stay tuned to the end of the post as there are 3 $50 gift certificates to be won!  You'll also find a full list of blog participants.

For my project I have used Dinosaur Friends and Dinosaur Additions stamp set and co-ordinating dies.  I started by stamping my images on to copic friendly cardstock with a black dye ink.  I used some nice rich earthy tones to color my images...here are the colors I used in case you want to use the same:

T-Rex - YG67, YG63, YG61, E08, YR07

Brachiosaurus - E47, E44, E43, E42, YR24, YR23

Diplodocus - E44, Y26, Y23

Palm trees - G99, G94, E27, E25, E23

Grass, E43, E43, YG63, YG61

Bones - W3, W1, W0
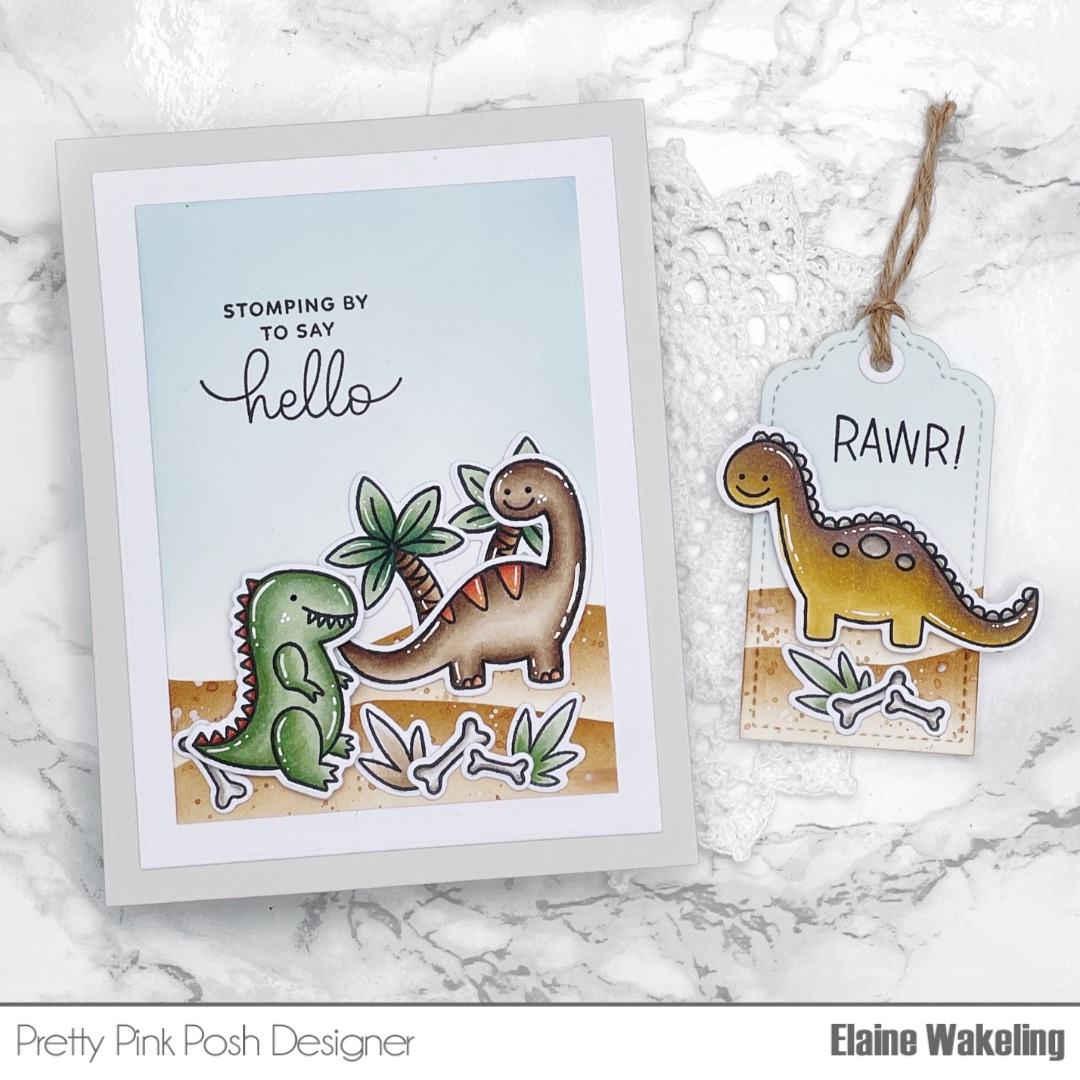
Once all the images were colored I used the co ordinating dies to cut out all the images.  I set them aside while I worked on the card scene.

I cut a piece of Bristol smooth cardstock to 4.5" x 3.25".  I created some wavy shaped masks from sheets of masking paper and used these to create some desert style hills.  I used Distress Ink in Vintage Photo, concentrating the color towards the tops of the hills.  For some added interest and texture, I loosened some of the Vintage Photo with some water and used a small paint brush to flick on some splatters.  For the sky I used Distress Ink in Tumbled Glass, making sure to blend from the top down to give a gradient effect.

Using a combination of liquid adhesive and foam tape I secured the images to the scene.  The sentiment was stamped using a black pigment ink.

I really like the look of layers so I secured the scene panel to a white panel measuring 5 1/8" x 3 7/8" and secured the whole thing to a light grey A2 sized card base.  

I created a matching tag using a tag die from Stitched Essentials 1 Dies.  I used the same masking techniques and ink colors, I love giving cards with a matching tag!  

I hope you enjoyed my project today....now for the chance to win a prize!  Be sure to leave a comment on each blog on the hop (participants below) - winners will be picked randomly and all comments must be left by 11.59pm PST on 6/23/22.  Winners will be announced on the PPP blog.

Hop participants


I hope you enjoy all the inspiration on the hop and love all the new products in this release!  Happy hopping (and shopping!! 😜) 
Crafty hugs, Elaine xxxx

Tuesday, 15 March 2022

Pretty Pink Posh Spring Release!


Hello Friends!  Another amazing Pretty Pink Posh release has arrived and its full of fun and cuteness!  Today is Day 2 of blog hopping and there are amazing prizes to be won so be sure to check that out at the end of this post!  I've also listed all of today's participants at the end of this post to help you hop along and see all the amazing projects being showcased.


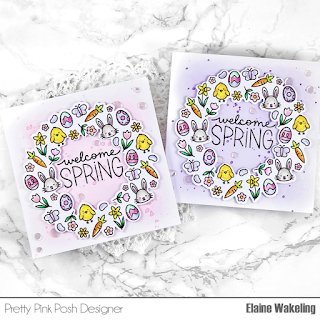
For my project today I have created two cards using the new Easter Wreath stamp set and co ordinating die.  The itsy bitsy spring images in this wreath are so adorable and I love the slightly bigger images that are included in the set too. 
I started by stamping the wreath image on to copic friendly card stock with a black dye ink and used my copic markers to color all of the images.  Once the images were colored I cut the wreath out with the co-ordinating die and set them aside.
I created two card bases by cutting a piece of white card stock to 8" x 4" and scored the long edge at 4" to create a square card base.  Taking my Distress Inks in Worn Lipstick and Villainous Potion I blended on colour directly on to each a card front using a blending brush and a light hand.  I like to start by applying very little pressure at first and build up color very slowly to create a nice smooth appearance.  To create a little more interest I smooshed the ink pads on to my glass mat, added a few drops of water and used small paint brush to flick on some splatters. 
For the sentiment in the middle of the wreath I stamped 'welcome spring' from the new Easter Signs stamp set in a black pigment ink.  I popped some foam squares on the back of the wreath and then adhered the wreath to the card front.  For some extra detail and sparkle I added a few sparkling clear confetti with small dabs of liquid glue.

That finishes up this project!  I hope you liked these cute little Easter cards :)  

For a chance to win a $25 gift card to the Pretty Pink Posh shop (there are 3 up for grabs...one each day of the hop) then don't forget to leave a comment on each blog post on the hop!  Please make sure you leave your comment by 11.59pm PST on 20th March.  Winners will be announced on the PPP blog.  Here are a list of all the participants on today's hop...good luck and happy hopping:

Elaine Wakeling < you are here


Thursday, 10 February 2022

Pretty Pink Posh 8th Birthday Anniversary Release Celebration!

Hello friends!  Today we are celebrating Pretty Pink Posh's 8th Anniversary with a new release! This release is full of fun new products which I know you'll love!  All products will be released on 10th February!  Be sure to also check out the free gift at the end of this post and a 10% discount offer.

To celebrate the release there are 3 $50 gift certificates up for grabs (one winner each day). Winners will be picked randomly along the blog hop. Comments must be left by 11:59 PM PST on 2/16/2022. Winners will be announced on the PPP blog.


For my card today I have used the birthday wreath stamps set and co-ordinating die, birthday circles stamp set and the birthday wishes script die.  I first started by stamping the wreath from the birthday wreath stamp set and the koala image from birthday circles on to copic friendly cardstock with a copic friendly black ink.  I used my copic markers to colour the images, here are the colours I used:
Teal: BG78, BF75, BG72
Pink: RV69. RV55, RV52
Yellow: Y15, Y13, Y11
Koala: W6, W4, W3, W1, R83
Once the images were coloured I used the co-ordinating die to cut out the wreath and fussy cut the koala with my cutterbee scissors.  I set the images aside to work on the background.

In order to fit the die cut sentiment and the wreath image on to the card front I decided to make a 5"x7" card.  I cut a piece of black cardstock to 4.75" x 6.75" and used a metallic silver paint to splatter on some silvery splatters.  While the splatter panel was drying I cut the birthday wishes die 3 times from heavy weight white card stock.  Before adhering the layers together I gently applied color to one of the die cut pairs.  I used a colour as close to the teal colour as I could find in my stash to help create a cohesive look with my copic colored images.  I focused most of the colour at the top of the word 'birthday' and gradually lightened my hand to create a gradient effect.  Using liquid adhesive I adhered all the layers together to create a sturdy dimensional sentiment.  
I went ahead and applied foam to the back of the wreath image and secured it to the card front.  Foam tape was also applied to the koala and secured to the card in the middle of the wreath.  I used liquid adhesive to secure the die cut sentiment to the card.

The card panel was secured to a white side folding card base (10"x 7" scored at 5" to create a 5"x7" card base) with liquid adhesive.  To finish off the card I used some metallic silver pearls in various sizes around the card.
I really hope you liked my card and all the rest of the inspiration on day 1 of the 3 days of blog hops!  Here is the full participant list for day 1:

Thank you so much for joining me, don't forget to leave a comment for a chance to win a $50 gift certificate to the Pretty Pink Posh store!

Crafty hugs, Elaine xxx

Monday, 15 November 2021

Mama Elephant Little Gingerbread Agenda Card & Tags

Hey Crafty friends!  It's been a while since I posted on my blog but I just had to share this card with you here as I just love these cute little Gingerbread Agenda stamps from Mama Elephant. I couldn't resist making a couple of tags to go with the card too.

To start the card I cut a panel of smooth white heavyweight cardstock to just larger than 5.5" x 4.25" and blended on ink using Distress Inks in Festive Berries, Worn Lipstick and Spun Sugar.  I applied Spun Sugar all over the panel first, then applied Worn Lipstick all around the edges trying to keep the centre from getting too dark, then I applied the Festive Berries around the edge, carefully drawing the colour in with my blending brush.  To add some interest to the panel I smooshed some Festive Berries on to my mat, loosened it with a few drops of water and then splattered on ink all over the panel with a small paint brush. I set the panel aside to dry and in the meantime ink blended on Spun Sugar all over another piece of white cardstock measuring 4" x 5.25".  Once my ink splattered panel was dry I ran it through my die cutting machine along with the Mama Elephant Little Globies Cover Plate.  I also ran the Little Globies Cover Plate through my machine again with a piece of white heavyweight cardstock.  With the plain white negative pieces I used the stitched hill borders from the Landscape Trio die set to create some snowy hills to sit inside my snow globe cut outs. I set all my die cutting aside to work on stamping and colouring my Gingerbread people.

I used my Silhouette machine to cut out all the little Gingerbread Agendas.  I then stamped them and coloured them with my Copic markers.  The pinks and reds I used are my favourite combos and I use them a lot in my projects!

Before assembling the card I took some glittery gold cardstock and die cut the bases for the snow globes.  I applied some liquid adhesive to the back of the snow globe panel and adhered it to the panel covered with Spun Sugar Distress Ink.  I then placed the stitched snowy borders in to the snow globe openings and adhered the gold glittery bases to the front of the card.  I used my Nuvo Aqua Shimmer Pen to apply a thin layer of shimmer on to the hills and then glued my gingerbreads in to place.  

To go with the card I created the cute tags using some more Mama Elephant goodies.  I used the smallest tag die in the Tags A Lot die set and applied the same Distress Inks, along with some splatters.  With the some left over ink blended cardstock from the card I cut two hexagonal shapes from the Winter Taggins die set.  I also created two stitched hills by die cutting a white hexagon shape and using the same hill borders to create snowy hills.  I cut two snowflake tags from white cardstock with the Winter Taggins set plus 2 white bows for layering and also 2 bows from gold glittery cardstock.  The gold elements helped to tie the two projects together.  Before assembling all the tags together I stamped a sentiment from the Mama Elephant Mixed Holiday Greetings stamp set in Versafine 

Clair Nocturn Ink.  All my layers were adhered together with liquid adhesive and then my little gingerbread people on top.  I used some bakers twine through the holes at the top.  As a final touch I used a white Gelly Roll pen to add dots to the cheeks and some highlights to make things pop!

I really hope you enjoyed this project!  Please feel free to drop me a message if you would like anything explained or have any questions... I love getting messages and spreading the crafty love!

Hopefully I'll be back soon soon with another festive project to share xxx

Monday, 13 September 2021

Pretty Pink Posh September 2021 Release Blog Hop

Pretty Pink Posh September 2021 Release Blog Hop

Day 1

Hey Friends!  Welcome back to my blog!  I'm so excited you're here to join me for day 1 of the Pretty Pink Posh September release.  You should have joined me from super talented Leica!  I hope you enjoy all the card inspiration on the hop and be sure to check out the giveaway - more details at the end of this post!


My card for the hop features the Falling Leaves Background Stencil with sentiments taken from the Falling Leaves stamp set.

Taking my stencil I chose a leaf and used post-it tape to mask off any surrounding leaves.  My card panel was a piece of smooth white heavyweight cardstock and I laid my chosen leaf opening on the card.  I rotated the stencil as I applied ink through the openings, moving from top to bottom  I always like to start with the biggest image and fill in gaps with smaller images.

My chosen Distress Inks for this card were Aged Mahogany, Vintage Photo, Peeled Paint and Carved Pumpkin. When applying the ink through the stencil I focused the concentration of colour at the base of the leaf, getting lighter towards the top.  I love the dimension and interest this gives the leaves. 

To break up the white in the background I added some ink splatters in Vintage Photo & Aged Mahogany Distress Ink along with with some Gold Paint which gives a hint of shimmer.  Once the panel was dry I trimmed it down to 5"x 3.75" and secured it to a Chestnut coloured A2 sized cardbase.

For the sentiment I gold heat embossed the word 'Thankful' on to white cardstock and cut it out with the co-ordinating die.  To give the sentiment dimension I cut the word 'Thankful' two more times and adhered all the layers together with liquid adhesive.  I white heat embossed the 'Happy Thanksgiving' on to the same Chestnut cardstock and trimmed in to a thin strip.   A couple of thin strips of foam tape were used to adhere the sentiment to the card.

As a final embellishment and to add a touch more sparkle I added a few jewels in Espresso. 

I hope you enjoyed this card and it gives you all the Autumn feels.  Next on the hop is the amazing Channin Pelletier.

GIVEAWAY!!  There are 3 $25 gift certificates up for grabs (one winner each day). Winners will be picked randomly along the blog hop. Comments must be left by 11:59 PM PST on 9/19/2021. Winners will be announced on the PPP blog.

Here are all the wonderful designers on today's hop:

Thank you so much for joining me today and celebrating the Pretty Pink Posh September 2021 release.  Happy hopping!  Love and hugs, Elaine xx


Tuesday, 10 August 2021

Pretty Pink Posh August 2021 Release Blog Hop

Pretty Pink Posh August 2021 Release Blog Hop

DAY 1

Hello and welcome to my blog, crafty friends!  I'm so so excited to be part of this blog hop to celebrate the spooky cute Pretty Pink Posh August 2021 release!


Hopefully you've come from Leica's blog and seen some amazing inspiration so far but don't worry, I've listed all the blog hop participants at the end of this post in case you've missed any or started here.  ALSO, be sure to check out the GIVEAWAY at the end of this post! Now on to my project for the hop!  

For my card I started by stamping the Halloween Circles on to copic friendly cardstock with a copic friendly black ink.  I coloured all the images with copic markers and used the following combinations:

Spider: W8, W6, W4
Cat & Hat: C10, C7, C5, RV66, RV63, E25, E23, E21
Ghosts: B02, B01, B000
Pumpkins: E18, YR27, YR24, W8, W6, W4, YG99, YG97
I really wanted to create an ink blended look in the background of the circles so I stamped all of the circles again on to masking paper and cut them out.  I also cut out masks for the circles.

Once all the images were masked I used a medium sized ink blending brush to apply Lilac Poses Tuxedo Dye Ink on each of the circles focusing the majority of the colour in the centre and fading out.  To add interest to the background I added some splatters using the same Lilac Poses Ink along with some black paint splatters.  The best part is removing the masks, so satisfying!

For my card base I used the same Lilac Poses Ink and blended all over a piece of white card measuring 3 3/8" x 8.5".  While I had the ink out I also created a tag with the same background.  The tag die is from the Spring Circles co-ordinating die. I added splatters of Lilac Poses ink, black paint and white gauche.  From black card I cut a scallop frame from the Slimline Scallop Frames die set and the zigzag circles from the Halloween Circles die set.  
I die cut out my stamped circles using the round circle die in the Halloween Circles co-ordinating die set and secured them with foam tape to the black circle bases.  Next, I secured the black scallop frame to the card base with liquid adhesive.  I used liquid adhesive to secure all three circles to the card front trying my best to space them out evenly.

For the sentiments I used a stamp from the BOO stamp set and white heat embossed it twice on to black card stock.  I trimmed the sentiments down to thin strips and secured the sentiments to the card and tag with foam tape.
My card panel was secured with liquid adhesive to a slimline card base.  To finish off the tag I used my crop-a-dile to punch a hole, add an eyelet and thread on some ribbon.

So that wraps us the post for my card, thank you so much for joining me and I really hope this project inspires you for your own creations.  Next on the hop is Channin Pelletier but just in case you need the full list of blog hop participants you can find them all here:


Finally, don't forget to leave a comment each day for a chance to win a $25 gift certificate to the Pretty Pink Posh shop!  3 lucky commenters (one each day) will be picked at random to receive a gift card.  Good luck everyone!! Happy hopping and don't forget to visit the Pretty Pink Posh blog again tomorrow for Day 2! xxx


Friday, 15 January 2021

Pretty Pink Posh 7th Birthday Anniversary Release Celebration!

 Hello friends!  Today we are celebrating Pretty Pink Posh's 7th Anniversary with a new release!  This release is full of amazing new products including slimline dies which are so popular at the moment.   


To celebrate the release I have created a colourful card using Let's Party stamps and co-ordinating dies along with the Layered Bokeh Stencil set for a beautiful soft background.

I used Memento Tuxedo Black ink to stamp images from the Let's Party stamp set on to copic friendly cardstock.  I used copic markers to colour my stamped images and the main colours were:
B60, B63, B66
RV63, RV66, RV69
BG11, BG13, BG15, BG18

Using the co-ordinating dies  I cut out the images and also cut a frame with the 'Joy' shaker die from heavy weight white card stock.  The frame was ink blended with Peacock Feathers Distress Ink.

For the background of the card I used a piece of white heavy weight card cut to 5"x 3.75" and used all 3 of the stencils in the Bokeh Layered Stencils set.  I started with the largest circles first and tapped most of the ink off my brush before gently applying the ink through the stencil.  To get depth on the layered circles I applied slightly more ink and more pressure as I moved through the different sizes of circle stencils.  The sentiment was white heat embossed on to black card stock and trimmed down to a thin strip.

The base layer of the card was a very light blue card panel cut to 5.5" x 4.25" secured directly to an A2 side folding card base.  My bokeh layered panel was secured to the card with dimensional foam tape.  The circular frame was secured with liquid adhesive and the sentiment and circular stamped panel secured with more dimensional foam tape.

To give the card some sparkle I covered all the stamped confetti images with Pretty Pink Posh jewels in Sea Glass, Watermelon and Pearl (my faves!)  I applied some Nuvo Aqua Shimmer Pen to the balloons and cupcakes for extra sparkle!

With some left over ink blended scraps and coloured images I whipped up some quick tags using tag dies from Stitched Essentials 1 die set.


I really hope you enjoy these projects and the rest of the release....be sure to visit the Pretty Pink Posh blog for lots more inspiration and a detailed look at all the products.  There are some freebies if you spend over $100 and don't forget you can use the code CELEBRATE7 for 10% off your order until 1/17/2021 11.59pm (see graphic for full terms).

Thank you for stopping by, I hope to see you back here again soon for more card inspiration!  Keep safe and well, Elaine x

*Affiliate links are contained in this post, this means that I receive a small commission from
purchases made at no extra cost to you.  I appreciate all purchases
made through my links and I am truly
grateful for the support, mwah x


Thursday, 7 January 2021

Winter Birthday Card

 Hello crafty friends!

It has been a few weeks since I wrote a new post but I hope you all had a safe and enjoyable Christmas period.  Things are very hectic at Pink Peppermint HQ but I'm so grateful for my crafty outlet and this lovely, supportive community.

For today's card I have created a fun, wintery birthday card using some Pretty Pink Posh goodies (*).  The sets I have used today are Penguin Pals, Holiday Pals, Holiday Signs and Stitched Essentials 1 Dies.

I stamped out my images with Memento Tuxedo Black ink on copic friendly card stock and coloured them in with copic markers:

Penguin - W4, W3, W1, W0, RV11, Y38

Presents - B97, B95, B93, B91

Trees - RV69, RV66, RV52, B21, B23, E47, E44, E43

For the card panel I cut a piece of white cardstock to 5.25" x 4" and blended on some Distress Ink in Chipped Sapphire, concentrating the colour in the centre of the card and fading the colour away towards the outer edges.

I white heat embossed the words happy, winter and birthday on to some navy card.  Each word was trimmed down to a small strip with a guillotine trimmer.

All of the images were adhered to the card panel.  Some trees were directly adhered with liquid adhesive and some of the trees, penguin and presents were adhered with dimensional foam tape.  Before securing the sentiments I watered down some white gauche and and flicked the whole card front with paint for a snowy scene.  The sentiments were adhered with liquid adhesive with the help of a T-square ruler to line them up straight.

Finally the whole panel was mounted on a navy panel measuring 5 3/8" x 4 1/8" and secured on to an A2 side folding white card base.

With some of the left over images I created a cute tag to co-ordinate with my card.

Thank you for stopping by today!  Hope you have a great day x

(*)  The products I used in this project have all been purchased by me however affiliate links are contained in this post.  I appreciate any purchases made through my links and thank you for your support xx

Saturday, 5 December 2020

3 Lawn Fawn cards using Mojo Monday 2 Sheet Wonder

Hello Crafters!  Welcome back to a new blog post where today I share some cute Lawn Fawn Christmas cards made with the help of the Mojo Monday 2 sheet wonder challenge (original challenge is here Mojo Monday 533 - 535 - Poetic Artistry)

For my cards I used 2 sheets of paper from the Milk & Cookies Doodlebug Design paper pad (this one is old but you can use any papers you like) and I pulled out lots of scrap papers to help mat the layers which gives more depth and dimension.  I amended the measurements on the challenge sheet as Doodlebug papers are 6"x6" (and not 6" x 6.5").  See below for my amended measurements.


Here are the measurements for the matting layers A-D (they are all 1/8" larger)

A = 5 3/8" x 4 1/8" 

B/C = 3 1/8" x 2 1/8"

B/B (together for card #534) = 4 1/8" x 3 1/8"

D = 4 1/8" x 7/8"

Image panel dimensions:

Sketch 533
3 1/4" x 2 1/4" (matting panel 3 3/8" x 2 3/8"

Sketch 534
2" x 2" (matting panel 2 1/8" x 2 1/8")

Sketch 535
Circle 2 1/4" (matting circle 2 1/2")

Before making your first cut (please see the challenge sheet) have a look at the orientation of your pattern.  You want to make sure that you cut your paper so that you can use your papers in the orientation you want.

Once I cut both sheets in to pieces I played around with the papers according to the sketches and figured out how I wanted to arrange them.  I secured all the pieces to a matted layer using various scraps from my scrap box - this project is a great way to work through left over coloured paper scraps!

For the images on the front of the card I used Lawn Fawn Ho Ho Holidays and Holiday Helpers.  I coloured them with Copic Markers in the following colours:

Reds: R39, R37, R35

Pink: R85, R83, R81

Hair/Beard: W6, W4, W3, W1

Belt/Boots/Shoes: C10, C7, C5

Buckle: Y26

Trim/Apron: C3, C1, C00

Duck: Y15, Y13, Y11

Box: E77, E74, E71

To give some dimension to the image panels on the cards I lightly used a blending brush to lightly apply some Distress Ink in Festive Berries.  I really like the pink/red tone of this ink and it paired well with the colours on the patterned paper and copic coloured images.  I secured my images with liquid adhesive and also added some red star confetti to add to the sparkle!  I covered the images in a light layer of Nuvo Aqua Shimmer Pen which gives a subtle shimmer as the cards move.

The sentiments were stamped in my mini Misti with Versafine Onyx Black Ink.  I used 'Merry Christmas' from Bitty Holiday Wishes by MFT.  For sketch #534 I adhered a 'Seasons Greetings' cut apart.

All of the card panels were secured to A2 sized heavy weight white card bases.

Check out the video below for a 'how-to' guide

I hope these cards inspire you to use pull out some of your patterned papers and create some fun and fairly quick and simple (Christmas) cards.  Once you have the measurements all sorted out you could easily create a lot of cards in a production line like style.

Hope to see you back here again soon! 
Elaine xx

Saturday, 21 November 2020

Lawn Fawn Slimline Christmas Scene Card - Happy Holiday Critters

 Hey friends!  Today I'm sharing details of this super cute mouse filled slimline card for the which I created for Lawnfawnatics Challenge #89 'Happy Holiday Critters'.


I stamped and coloured lots of images from various sets of Lawn Fawn stamps (see below for a full list of supplies).  I coloured all the mice the same colours and many of the images are coloured with same pinks and reds (all listed in the graphic) to keep the colouring quick and keep the card looking cohesive throughout.  

For the background I used Distress Oxide inks in Spun Sugar and Picked Raspberry, focusing the intensity of the colour at the top of the card stock.  To deepen the shade further I brought in Distress Ink in Festive Berries.  I added some white dots with a gel pen to create more interest and give the look of wallpaper to the scene.

The idea of the card was to create a production line so I know my oven would go in the middle of the card.  I spent some time arranging the left side of the card to feature all the baking and mixing elements and on the right of the oven, I pulled together lots of images to create a feast for Santa!

I kept the sentiment simple, not least because I didn't have a great deal of room, but also wanted to keep the focus on the images.  The sentiment uses two stamps from 'A Creature Was Stirring' stamp set which were white heat embossed with my favourite white embossing powder (Ranger Fine Detail) on to black card stock and cut into thin strips.

My card panel measures 8 3/8" by 3 3/8" and was secured down to a white card base measuring 8 1/2" by 3 1/2".  

To embellish the card I added some sparkle with my Nuvo Aqua Shimmer Pen and some shine with Nuvo Crystal Glaze.

For a full video tutorial please view my YouTube video!

If you liked this card you might also be interested in this one too!

Here is the list of supplies I used to create this card (pssst....affiliate links are included.  I appreciate any purchase made through my links - it's at no extra cost to you but helps me out so much and enables me to keep bringing you the crafty goodness 💗)

Sprinkled with Joy – Lawn Fawn 
A Creature Was Stirring – Lawn Fawn 
Baked with Love – Lawn Fawn 
Ho Ho Holidays – Lawn Fawn 
Holiday Helpers – Lawn Fawn 
Dandy Day – Lawn Fawn 
Jet Black Ink – Lawn Fawn 
Distress Oxide Spun Sugar - https://amzn.to/3pJ8BrQ 
Distress Oxide Picked Raspberry - https://amzn.to/3pLxbbC 
Distress Ink Festive Berries - https://amzn.to/3kKifac 
White Gel Pen - https://amzn.to/2K1oIkd 
Black Glaze Pen – Gelly Roll - https://amzn.to/3lO2oZl 
Versafine Onyx Black Ink - https://amzn.to/38F7EL6 
Versamark Ink - https://amzn.to/3nDbo47 
Embossing Buddy - https://amzn.to/2UEX7Ya 
8” Guillotine – Tonic/ Tim Holtz - https://bit.ly/34VYLJD 
Mini Misti Stamping Tool – My Sweet Petunia - https://bit.ly/2ISjnv0 
Super Fine White Embossing Powder – Ranger - https://amzn.to/38YsYeX 
Aqua Shimmer Pen - https://amzn.to/3lQFzV5
Copic Markers
Red - R59, R39, R29 Pink - R85, R83, R81 
Mice – E44, E43, E42, E41, E40, R20, R00 
Greys – C7, C5, C3, C1, C00 
Dark Green – G99, G94, G21 
Gingerbread House - E35, E33, E31, E29, E27, E25 Y13, Y11, C1, C00
Gingerbread Mice - E27, E35, E33 
Pudding – E79, E77, E74, C3, C1, C00

If you are inspired by my card and create something be sure to tag me and show me!

I'll be back next week with a new project.  Elaine xx


Saturday, 14 November 2020

Gnomey Winter Wonderland Slimline Card

 Hello and welcome back to my YouTube channel and blog!  Today I am sharing a slimline card featuring a winter wonderland full of cute gnomes using stamps and dies from Mama Elephant.


To start with I ink blended a piece of light blue coloured card and starting at the top ink blended on some Distress Ink in Peacock Feathers.  I focused the majority of the colour at the top.  To darken the sky a little more I used Distress Ink in Blueprint Sketch and finally used a dye ink in Navy from Hero Arts.  

To add the falling snow I dotted on white dots using a white paint pen by Jane Davenport (link down in the supplies section).  Sometimes I just can't be dealing with the splatter clear up :) and this method is so super quick!

I used the Slim Woodland die by Mama Elephant to help build the scene.  I cut two from heavyweight white.  I trimmed the bottom section to just leave the snow banks and ink blended on some Peacock Feathers.  For the trees I used Distress Inks in Antique Linen and Vintage Photo.  

For the gnomes I used Little Gnome Agenda stamps and used the candy house from Cookie Christmas and coloured these with my copic markers as follows:

To add more interest to the card I coloured some holly sprigs from Snow Friends stamp set and some gift packages taken from Page Huggers stamp set.  To ensure they co-ordinated I used the same colours of copic markers.

On the trees I added some chunky glitter, I can't make a card without adding sparkle at this time of year! 

I trimmed down my blue ink blended panel so that it fit behind the woodland die cut and then adhered the snow banks on top.  I made a card base from heavy weight white card (I have a stash of these pre made....the card base measures 8.5" x 3.5") and secured the scene panel to the card base.

For the sentiment I used Mama Elephant's Jingle Greetings stamp set and used Versafine Onyx Black Ink to stamp this on to the card front.

To finish up the card I applied some Nuvo Aqua Shimmer Pen on to various parts of images and also accented certain elements with Glossy Accents....I love the dimension this gives.  I added a small clay heart to the gnomes sign.

For a full 'how-to' tutorial check out the video below!  I'd love to know what you think :)


Supplies used:

Slim Woodland Creative Cuts - Mama Elephant
Little Gnome Agenda stamps - Mama Elephant
Cookie Christmas - Mama Elephant
Jingle Greetings stamps - Mama Elephant
Page Huggers stamps & dies - Mama Elephant
Snow Friends stamps & dies - Mama Elephant
Distress Ink:
Peacock Feathers - https://bit.ly/36zomca
Blueprint Sketch - https://bit.ly/2UqcymQ
Antique Linen - https://bit.ly/2Um8ZxZ
Vintage Photo - https://bit.ly/35sreIt
Pool - Navy Ombre Ink Pad - Hero Arts
White Paint Pen - Jane Davenport https://bit.ly/2Iyf7RB
White Gel Pen - https://amzn.to/2K1oIkd
Versafine Onyx Black Ink - https://amzn.to/38F7EL6
Copic Markers (see colour map)
Aqua Shimmer Pen - Nuvo - https://bit.ly/2UocEvp
Glossy Accents - Ranger - https://bit.ly/3py1qD5 & https://amzn.to/3lv1DnN
300gsm Premium White Card Stock - Hobby Craft

 ***

Thank you for joining me here on my blog!  I look forward to seeing you back here again soon for some more wintery themed cards!

***

Affiliate links are contained in the post.  This means should you purchase something through one of my links I will receive a small commission at no extra cost to you.  I appreciate every purchase made and am truly grateful for your support xx


Sunday, 27 September 2020

Fox Costumes Before 'n Afters - Halloween Card #6

I'm back with another card for Halloween!  Couldn't wait to used my new Lawn Fawn Fox Costumes stamps and make a fun fall themed card.
I started by finding an inspiration photo on Pinterest then picked out some Distress Ink and Oxide colours that I thought matched quite well.
I cut a scalloped slim panel from Strathmore Bristol Smooth card stock using Scalloped Slimline Die from Time for Tea Designs.  Using an assortment of Distress Inks I ink blended the panel.  The colours I used were Distress Ink in Dried Marigold, Spiced Marmalade, Stormy Sky, Faded Jeans & Black Soot.  I also used a little Weathered Wood Distress Oxide to blend from orange to blue.  To add some distressing to the panel I splattered on some rose gold metallic paint and some black paint.  I set the aside to dry.
https://amzn.to/3lTzy9y
I stamped and cut the foxes and coloured them in with alcohol markers.  A list of the main colours used can be found in the colour map pictures below
The grass banks the foxes are each standing on were made from black Sparkle card from the Autumn sparkle card pack.  I cut a long strip, 1/2" wide and then ran the strip through the die cutting machine with a grass border die from the Landscape Borders die set by Time for Tea designs.  I cut the strips in to 2" lengths.  The strips were adhered with liquid adhesive at alternate intervals down the card.
To give the strips the scalloped edges I ran the whole panel back through the die cutting machine with the same scallop slimline die.  
The scallop panel was adhered to a white heavy weight card panel measuring 8 3/16" x 3 3/16" then the white panel adhered to a black slimline card base.  The card base measured 8 1/4" by 7" scored at 3 1/2" to create a card front measuring 8 1/4" 3 1/2".
Scotch 3M foam tape was secured to the back of all the foxes and adhered to the card on the sparkly grass banks.  The accessory images (some from Fox Costumes and some from Spooky Village stamp set) were applied using liquid adhesive.
For the sentiment I stamped 'Trick or Treat' on to treated black card stock with Versamark Ink, coated the inked piece with Ranger Super Fine White Embossing Powder and heat set with my heat tool.  I cut the words out using my Tim Holtz Guillotine Trimmer, popped double sided adhesive on the back of each piece and secured them to the card.  A T-square ruler helped to get the strips straight.
To finish off the card I added some 'BOO' and 'EEEK' all over the background with Versafind Onyx Black Ink and a few bats from Spooky Village stamp set.  I applied some Nuvo Aqua Shimmer pen on various elements of the copic coloured images for some subtle sparkle.  Lastly I added a few small dots of glue and adhered some small gold star confetti.
I really hope you enjoyed this card, I really had fun making it!  Check a out the YouTube video below for a full how-to tutorial.

Supplies used:
Fox Costumes Before 'n Afters – Lawn Fawn
Spooky Village – Lawn Fawn
Scalloped Slimline Die – Time For Tea Designs **
Landscape Border Dies – Time for Tea Designs **
Strathmore Bristol Smooth Card
Distress Inks
- Dried Marigold
- Spiced Pumpkin
-  Stormy Sky
-  Faded Jeans
- Black Soot
Distress Oxide
- Weathered Wood
Classic Metallic Paints – Komorebi Watercolor Paints
https://amzn.to/3lTzy9y
Black Paint – Gansai Tambi Watercolor 36 pan
Black Sparkle card stock (Autumn) – Lawn Fawn
Copic Markers/Script markers
- Foxes - E99, YR24, E97, E33/E33, E31, E30
- Stripes/accessories - BG9, BG7, BG3, BG1 (Script)
- Yellow stripe/chicks - Y17, Y15, Y13, C3
-  Cake Frosting - RV66, RV66/B66,  B63
- Pumpkins - E09, YR27, YR24
-  Candy corns. Y07, Y04, Y02/Y17, Y13
Iridescent White Glitter – Glamour Dust
2 Way Glue Pen – Kuratake
Versamark Ink
Versafine Ink (Onyx Black)
Superfine White Embossing Powder – Ranger
Embossing Buddy – EK Success
Heat Tool
8” Guillotine – Tonic/ Tim Holtz
Liquid Adhesive - Tombo
Gold Star Confetti

Look forward to seeing you back here again soon for card #7 in the Halloween series!
Elaine xx

* some of the products used on this card were gifted (as part of work on other design team work).  I am not obliged to use these products on non-design team work, I do so because I love them :)

some links in the description list are affiliate links.  I appreciate and am grateful for any purchases made through my blog and supplies list!#

xxx

About

Search This Blog